Chapter overview
Every timing signoff run starts the same way. You set up the shell, the tool checks out its licenses, and a prompt appears. Most beginners treat this part as boring setup. However, a large share of lost run time comes from exactly here.
Let us consider two real situations. In the first, a long job stops after an hour because a CPU license was not free. In the second, a run on a smaller license quietly times one view instead of four. The report looks clean, and nobody notices the missing views.
Both problems have the same root. The engineer did not know what the tool checks at launch and what it checks later. Neither problem shows up as a loud error at the start. Thus, the only defense is to understand the rules before the first run.
This chapter removes both risks. We first place Tempus in the signoff flow. Then we look at the license products, how checkout works, and how to control it. Finally, we prepare the environment, launch the tool and learn to find help on our own.
Learning objectives
- Describe what Tempus reads, what it calculates and what it writes.
- Explain the difference between the Tempus L and Tempus XL base licenses.
- Name the option licenses and state what each one adds.
- Predict when an L-license run silently falls back to a single view.
- Work out how many CPUs a session gets from a set of stacked licenses.
- Choose between startup and dynamic license checkout, and set each one.
- Check that the license server is new enough for the tool.
- Set
PATH,MANPATHandTMPDIRbefore launch, and explain what happens whenTMPDIRis unusable. - Use
helpandmanto look up commands and message IDs.
Chapter roadmap
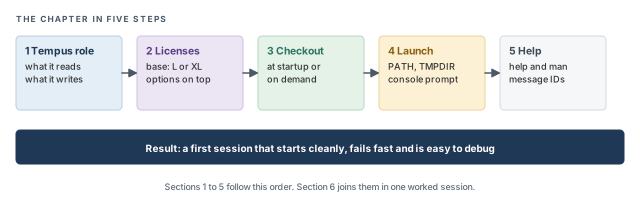
The chapter moves in five steps, from the big picture to the first working session. Figure 1 shows the order. Come back to it whenever you lose your place.
Key commands
Table 1 lists the commands and switches covered in this chapter, grouped by section. Do not try to memorize them now. Each one is explained when it is first needed.
| Section | Command or switch | What it does |
|---|---|---|
| 1 Tempus role | read_lib, read_verilog, read_sdc, read_spef |
Read libraries, netlist, constraints and parasitics |
| 1 Tempus role | report_timing |
Report the timing paths and their slack |
| 3 Checkout | tempus -lic_startup_options |
Check out the listed licenses at launch |
| 3 Checkout | tempus -lic_options |
Allow the listed licenses to be checked out later, when needed |
| 3 Checkout | set_license_check |
Check out or change licenses inside a running session |
| 3 Checkout | lmgrd -v, cdslmd -v |
Print the version of the license server daemons |
| 4 Launch | tempus -no_gui |
Start the tool with a console prompt and no window |
| 4 Launch | tempus -stylus |
Start the tool with the Stylus command interface |
| 4 Launch | auto_file_dir, auto_file_prefix |
Redirect and name the files the tool writes on its own |
| 5 Help | help, man |
Show command syntax, details and message meanings |
| 5 Help | viewlog, cda |
Open a log in a standalone viewer; browse help in the Doc Assistant |
1 What Tempus does in a signoff flow
1.1 The concept
Tempus is a static timing analysis (STA) tool. STA checks every timing path in a design without running a simulation. It does not need test vectors. Instead, it adds up delays along each path and compares the total with the clock.
A timing path is the route a signal takes from where it is launched to where it is captured. The most common path starts at one flip-flop and ends at the next. On each clock edge, the first flop sends new data, and the second flop must catch it.
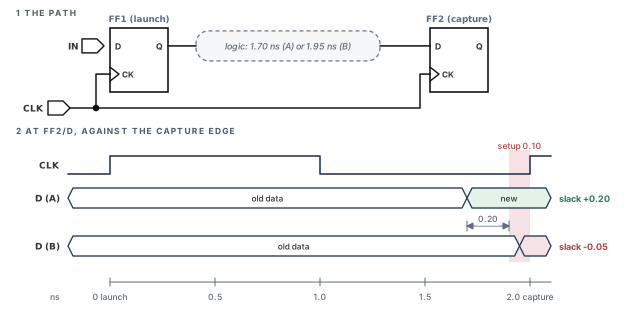
For example, assume a clock period of 2.0 ns. A path from one flip-flop to the next takes 1.7 ns. The capture flop needs 0.1 ns of setup time. The path then has a slack of 2.0 − 1.7 − 0.1 = 0.2 ns. A positive slack means the path meets timing.
Now assume the path takes 1.95 ns instead. The slack becomes 2.0 − 1.95 − 0.1 = −0.05 ns. A negative slack is a violation. The data would arrive too late, and the capture flop could store the wrong value.
Figure 2 draws both cases. The top half shows the path from FF1 to FF2. The bottom half shows the data at the D pin of FF2, measured against the capture clock edge.
Read the figure from left to right. The launch edge at 0 ns starts new data at FF1. The data travels through the logic. It must settle before the shaded setup window, which ends at the capture edge at 2.0 ns.
The word static matters. A simulator checks only the paths that its test vectors happen to exercise. STA checks every path, whether or not any test would reach it. Thus, STA finds problems a simulation could miss.
1.2 Why it matters
Signoff is the last timing check before the design goes to manufacturing. After that point, a fix means new masks, which is slow and very expensive.
The tool can be wrong in two directions, and both cost money:
- A missed real violation – the report looks clean, but the silicon fails at speed.
- A false violation – the report shows a problem that cannot happen. Engineers then spend days fixing it.
Thus, the tool must be set up correctly before any report is trusted. Much of this series is about making the tool see the design exactly as it will behave.
1.3 How it works
Let us consider Figure 3. The tool needs four kinds of input:
- Liberty libraries – delay and timing-check tables for every cell, such as how long an inverter takes for a given load.
- The gate-level netlist – the cells and the nets that connect them.
- Constraints (SDC) – clocks, input and output delays, and exceptions such as false paths.
- Parasitics (SPEF) – the resistance and capacitance of every wire, extracted from the layout.
The tool then works in five broad steps:
- Link the netlist to the library cells, so every instance knows its timing data.
- Calculate delays for every cell and every wire, using the library tables and the parasitics.
- Propagate arrivals from each startpoint through the logic, adding delays as it goes.
- Check each endpoint against its clock and its timing check, such as setup or hold.
- Report the slack of each path, worst first.
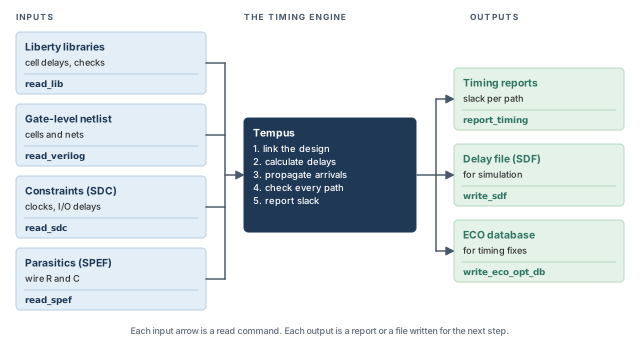
The results come out in three main forms. Timing reports show slack per path. An SDF (standard delay format) file carries the calculated delays to a gate-level simulator. An ECO database feeds the step that fixes the remaining violations.
- This chapter only names the read commands. The next chapter, Design Import, covers their options and the order in which they must run.
- The ECO database and timing fixes are covered in Signoff ECO.
2 Tempus products and licenses
2.1 The concept
A Tempus session always needs one base license. The base license decides what the tool can do and how many CPUs it may use. On top of the base, you can add option licenses for extra features or extra CPUs.
A simple picture helps here. Think of the base license as a truck, and the options as trailers. A trailer adds capacity, but it cannot move without a truck. In the same way, an option adds features, but it never starts the tool alone.
Figure 4 shows this stack. The rule at the bottom of the figure is the most important one in this section.
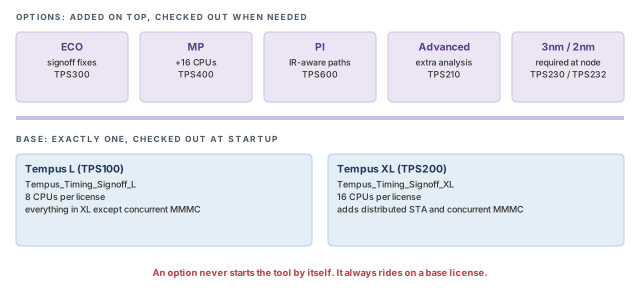
The tool follows three rules at launch:
- The base license (L or XL) is checked out at startup.
- An option license never starts the tool by itself.
- Options are checked out dynamically by default – only when a command first needs them.
2.2 The two base licenses
Table 2 compares the two base licenses. In short, Tempus L is Tempus XL without concurrent multi-mode multi-corner analysis. Tempus XL is the license for large, multi-view runs.
| Tempus L | Tempus XL | |
|---|---|---|
| Product code | TPS100 | TPS200 |
| License name | Tempus_Timing_Signoff_L |
Tempus_Timing_Signoff_XL |
| CPUs per license | 8 | 16 |
| Concurrent multi-mode multi-corner (CMMMC) | Not included | Included |
| Distributed STA (DSTA) | Not listed for L; a DSTA master needs XL | Included |
Two terms in the table need a short definition. A view is one combination of a timing corner and a constraint mode, for example "slow corner, functional mode". A real chip is often signed off in ten or more views.
Concurrent multi-mode multi-corner (CMMMC) analysis times several views in one session. Distributed STA (DSTA) splits one very large analysis across several machines. Both are covered in later chapters, in Multi-Mode Multi-Corner Analysis and Distributed STA.
The product list also carries two related products, with codes VDS100 and TPS500. TPS500 is for Library Validation. You will rarely request these in a timing run, but you may see them in a license report.
Your license administrator thinks in product codes, while the tool asks for license names. Keep Table 2 handy when you request licenses. It saves a round of emails.
2.3 The option licenses
Option licenses add features or CPUs to a running base. Table 3 lists them.
| Option | Code | License name or role | What it adds |
|---|---|---|---|
| ECO | TPS300 | Tempus_Timing_Signoff_TSO |
Multi-view signoff timing fixes (setup, hold, DRV, leakage); with L, also enables CMMMC |
| MP | TPS400 | Tempus_Timing_Signoff_MP |
16 more CPUs |
| PI | TPS600 | Option on Tempus XL or Voltus XL | Finds timing paths that are sensitive to IR drop |
| Advanced Analysis | TPS210 | Option | Extra advanced analysis features |
| 3nm | TPS230 | Option | Required to run 3nm designs |
| 2nm | TPS232 | Option | Required to run 2nm designs |
Let us look at each one briefly.
- ECO fixes the remaining violations after analysis. It works across many views at once and covers setup, hold, design rule violations (DRV) and leakage. With Tempus L, it has a second role: it enables CMMMC.
- MP (multi-processing) adds 16 CPUs. In a normal, single-process run, extra MP licenses simply add 16 CPUs each. In a distributed run, each process takes one MP, and CPUs stack in steps of 16.
- PI finds paths whose timing changes because the supply voltage drops (IR drop). It is an option on Tempus XL or Voltus XL. Power Domains, IR Drop and Aging covers it.
- Advanced Analysis unlocks additional analysis features beyond basic signoff.
- 3nm and 2nm are node options. A design at these nodes does not run without the matching option.
L plus ECO is a common pair for signoff fixing. L plus MP is a common pair when you need more threads on a single view.
2.4 The silent single-view fallback
This is the trap from the chapter overview. Let us consider a session that starts on Tempus L and loads four views. L does not include CMMMC. Thus, the tool tries to borrow a license that enables it – Tempus ECO, or a Voltus L or XL license.
If an enabling license is free, all four views are timed together. If none is free, the tool does not stop. It loads silently in single-mode single-corner (SMSC) analysis, which times one view only.
Why is this so dangerous? Because every number in the report is correct for the one view that was timed. Nothing looks broken. The missing views simply never appear.
Figure 5 shows both branches of this decision.
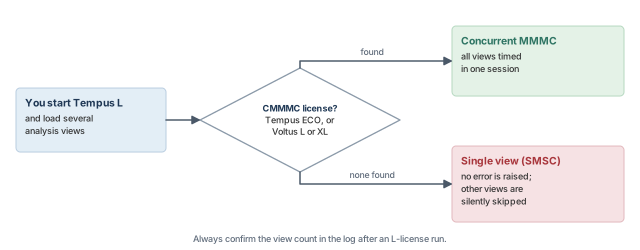
A beginner runs four views on Tempus L, sees a clean report and signs off. In fact, only one view was timed. The other three corners were never checked. Always confirm the number of active views in the log after an L-license run.
2.5 Adding CPUs by stacking licenses
Each license you add brings its own CPUs. The session can use the sum. Each extra L adds 8 CPUs, and each extra XL or MP adds 16 CPUs.
Let us work out the three cases in Figure 6:
- Tempus L alone – 8 CPUs.
- Tempus L plus one MP – 8 + 16 = 24 CPUs.
- Tempus XL plus one MP – 16 + 16 = 32 CPUs.
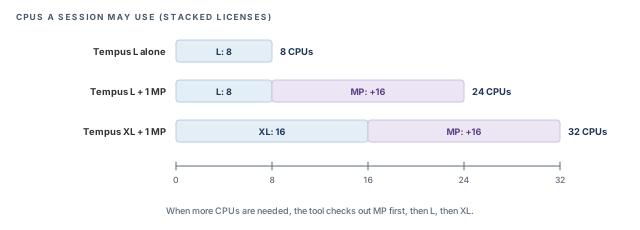
When the tool needs more CPUs, it checks out licenses in a fixed default order: MP first, then L, then XL. This order matters on a shared license server. If MP runs out, the tool may take an L or XL that another engineer was waiting for.
2.6 How many licenses a run needs
The license count grows with the run style. Table 4 shows the common cases. Each run style gets its own chapter later, so treat this table as a planning aid.
| Run style | Licenses needed |
|---|---|
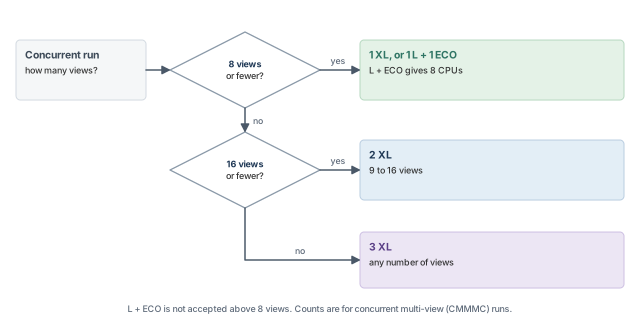
| CMMMC, 1 to 8 views | 1 XL, or 1 L plus 1 ECO (8 CPUs) |
| CMMMC, 9 to 16 views | 2 XL |
| CMMMC, unlimited views | 3 XL (L plus ECO is not accepted above 8 views) |
| Distributed MMMC (DMMMC) | 1 L or XL for the master, plus 1 L or XL per view; each process gets 16 CPUs on XL or 8 on L |
| Single-view DSTA | 1 XL for the master (16 CPUs), plus 1 MP per client; the MP gives the client XL features |
| CMMMC inside DSTA | Master: 1 XL; each client: 1 MP plus CMMMC licenses; at least 3 XL plus 2 MP in total |
| Interactive CMMMC ECO (Paradime) | Master: 1 XL plus 1 ECO; each client: 1 XL; all held from startup |
For concurrent runs, the first three rows reduce to two questions about the view count. Figure 7 turns them into a quick decision.
A few rows deserve a word of explanation:
- In Distributed MMMC, each view runs as its own process. Thus, licenses go one-to-one with views, plus one for the master.
- In single-view DSTA, an extra MP on a client adds 16 more CPUs to that client.
- Paradime is the interactive multi-view ECO mode. It holds all its licenses from the first second.
The licenses for multi-view STA are counted separately from the licenses for multi-view ECO. Plan both when a run does analysis and fixing together.
3 Controlling license checkout
3.1 The concept
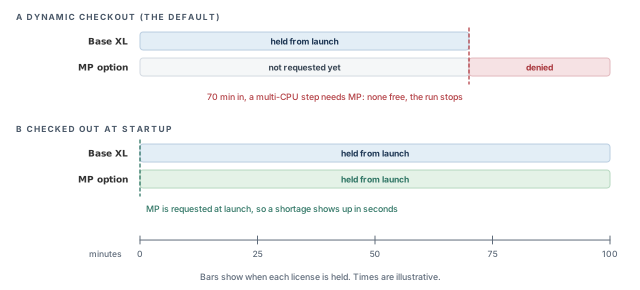
A base license is checked out at startup. Options, by default, are checked out dynamically – only when a command first needs them. This saves licenses for other users. However, it also means a shortage can appear deep into a run.
You can change this default in two ways. You can ask for options at launch, so they are held from the first second. Or you can switch dynamic checkout off, so the session uses only what it already holds.
3.2 Why it matters
Let us consider Figure 8. In case A, the MP option is requested 70 minutes in, when a multi-CPU step begins. No MP license is free, so the request fails and, typically, the run stops. In case B, MP is requested at launch. The same shortage shows up in seconds, before any time is lost.
The cost in case A is more than 70 minutes. The base license was held for that time and blocked other users. The compute farm slot was used. The engineer also has to rerun the whole job from the start.
3.3 The launch switches
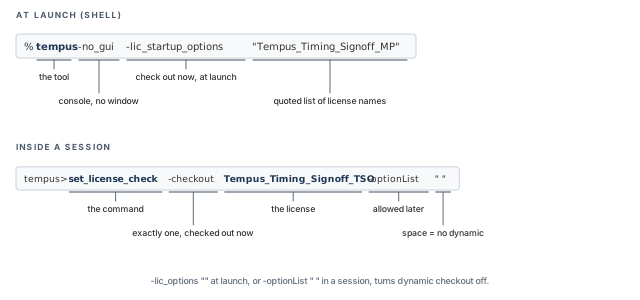
The launch switches control what is checked out and when. The general form is:
% tempus
    [-lic_startup_options "license1 license2"]
    [-lic_options "license1 license2"]
Each switch takes a quoted list of license names:
-lic_startup_options– checks out the listed licenses immediately at launch. If one is not available, you find out at once. Use it for options a long batch run is sure to need.-lic_options– lists the licenses the tool may check out later, when they are needed. Use it when you want to allow an option without holding it from the start.-lic_options ""– an empty list turns dynamic checkout off. The session then uses only what it holds. This is useful when license use must be strictly predictable.
The following example asks for MP at launch, so a shortage fails fast.
% tempus -no_gui -lic_startup_options "Tempus_Timing_Signoff_MP" ;# MP held from launch3.4 Changing licenses inside a session
Inside a running session, set_license_check does the same job. Its general form is:
tempus> set_license_check
    [-checkout license_name]
[-optionList "license1 license2"]-checkout(also written-checkoutList) – takes exactly one license and checks it out immediately. It is the in-session version of a startup checkout.-optionList– the licenses allowed for dynamic checkout from now on. To turn dynamic checkout off, pass a list that holds only a single space, written" ".
The following line checks out ECO immediately, in the middle of a session:
tempus> set_license_check -checkout Tempus_Timing_Signoff_TSO ;# check out ECO nowIt is better to put MP and ECO in -lic_startup_options for long batch runs. The reason is simple. A run that cannot get its licenses should fail in the first minute, not after an hour.
An option is never checked out before the base license. Do not list an option as if it could start the session on its own.
Figure 9 breaks both forms into their parts. The top line is a launch from the shell. The bottom line is the same idea inside a running session.
3.5 Checking the license server
The tool uses FLEXnet licensing. It is built on FLEXnet 11.16.4.0, so the license server must run version 11.16.4.0 or newer. Treat 11.16.4.0 as the floor, even if you see an older number quoted elsewhere.
An older server can make a valid license look missing. The typical symptom is this message at launch:
Fail to find any Tempus Timing Solution license...This message is misleading. The license exists and is valid, but the old daemon cannot serve it to the new tool. Thus, an engineer may waste hours checking license files that are perfectly fine.
To check the server version, run the two daemons with -v:
% lmgrd -v      ;# version of the FLEXnet license manager
% cdslmd -v     ;# version of the Cadence vendor daemon
Figure 10 puts the whole check in order, from the symptom to the fix.
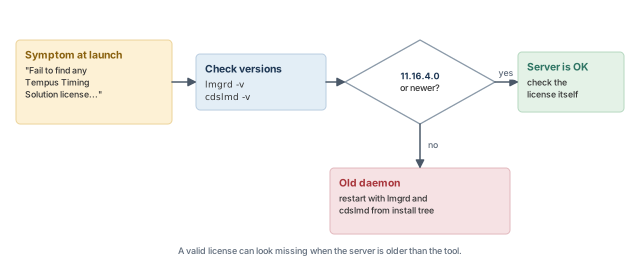
If the version is older than 11.16.4.0, the server needs a restart. Ask the license administrator to use the lmgrd and cdslmd from the tool's install tree.
4 Preparing the environment and launching
4.1 Setting the search paths
Before launch, two search paths must point into the install tree. Assume the tool is installed under install_dir.
PATHmust includeinstall_dir/bin, so the shell can findtempus. Without it, the shell reports that the command is not found.MANPATHmust includeshare/tempus/man,share/tempus/stylus_manandshare/tcltools/manunder the install tree. Without these,mancannot find command entries.
As their names suggest, the three manual folders hold different sets of entries. The first covers the default commands, the second the Stylus commands, and the third the Tcl tool commands.
4.2 Choosing the scratch area with TMPDIR
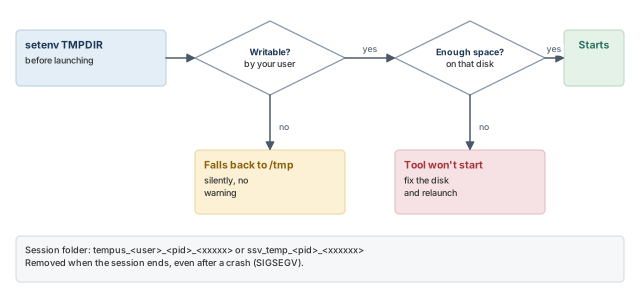
The tool writes large temporary files during a run. It places them under the directory named by the TMPDIR environment variable. If TMPDIR is not set, the default is /tmp. Set it in the shell before you launch the tool.
Inside that directory, each session makes its own subfolder, named like tempus_<user>_<pid>_<xxxxx> or ssv_temp_<pid>_<xxxxxx>. Here, <pid> is the process ID, so two sessions never share a folder.
The tool deletes this subfolder when the session ends – even after a crash (SIGSEGV). The same rules apply to distributed runs, both DMMMC and DSTA.
Two things can go wrong at launch. Figure 11 shows that they behave very differently.
- No write permission – the tool silently falls back to
/tmpand continues. You get no warning. - No free space – the tool does not launch at all. This failure is loud, so at least you notice it.
% setenv TMPDIR /scratch/tabish/tempus_tmp   ;# large local scratch disk
% tempus -no_gui ;# launch after TMPDIR is setIt is better to point TMPDIR at a large local scratch disk. A shared /tmp is often small. A large run can fill it, which slows or breaks other users' jobs on the same machine.
4.3 Launching the tool
The simplest launch is tempus -no_gui. It starts the tool without a window and gives a console prompt:
tempus>The console mode is the normal choice for batch runs on a compute farm, where no display is available.
The tool also has a second command interface, called Stylus, started with tempus -stylus. Stylus has its own command names, with equivalents for the default (legacy) commands. These chapters use the default command names, which you will see in most existing scripts.
4.4 Settings that must come first
Two kinds of settings belong at the very start of a session, before any design is read.
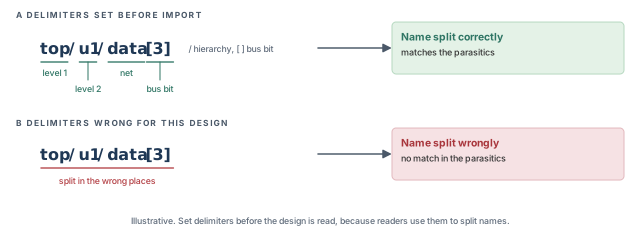
- Special characters and delimiters – for example, the hierarchy and bus characters used in DEF and PDEF files. Set them before import, because the readers use them to split names. Note that changing these delimiters also changes what the tool writes out.
- Auto-generated file names – the tool writes some files on its own. The
auto_file_dirsetting redirects them to a folder. Theauto_file_prefixsetting adds a prefix to their names.
Set auto_file_dir to a separate folder for each parallel run. Without it, two runs in the same directory can overwrite each other's auto-generated files.
Why must delimiters come first? Let us consider a net named top/u1/data[3]. The / and [ characters tell the reader where hierarchy and bus bits begin. If the reader uses the wrong characters, it splits names wrongly, and the design no longer matches its parasitics. Figure 12 shows the two outcomes.
PATH, MANPATH and TMPDIR before launch. Set delimiters and auto-file settings before reading the design.5 Getting help inside the tool
5.1 The concept
A signoff engineer looks up commands every day. Options change between projects, and nobody remembers all of them. The tool carries its own help, so you rarely need to leave the session.
The help built into the tool has one big advantage over a web search. It always matches the exact tool you are running. A web page may describe an option that your installation does not have.
5.2 Looking up commands with help and man
Two commands cover most needs. help gives the short form, and man gives the full entry. Table 5 shows which command answers which question. Figure 13, after the table, shows the order in which to try them.
| You want to know | Command | Example |
|---|---|---|
| General help | help |
help |
| The syntax of one command | help <command> |
help report_timing |
| Full details of one command | man <command> |
man report_timing |
| What a message ID means | help <message_id> |
help TECHLIB-1002 |
| The detailed entry for a message ID | man <message_id> |
man SI-2253 |
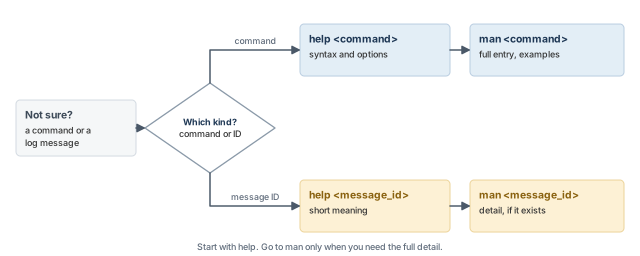
tempus> help report_timing   ;# short syntax: options and arguments
tempus> man report_timing    ;# full entry: options, defaults, examples
5.3 Looking up message IDs
Every warning and error in the log carries a message ID, such as TECHLIB-1002 or SI-2253. The first part names the area of the tool. The number identifies the exact message.
You can pass a message ID to help or man, just like a command name. Not every message ID has a detailed entry. When man finds nothing, help on the same ID still gives the short meaning.
tempus> help TECHLIB-1002    ;# short meaning of the message
tempus> man SI-2253 ;# detailed entry, if one existsWhen a message appears in the log, copy its ID and run help on it first. This is faster than searching the web, and it always matches the tool version you are running.
5.4 Reading logs outside the tool
Long logs are hard to scan in a terminal. The standalone viewer viewlog opens a log file in a window. With -file, you name the log to open:
% viewlog -file tempus.log ;# view the session logThe install tree also includes the Doc Assistant, started with cda. It lets you browse and search the tool's help pages outside a session.
help for syntax, man for detail, and help <message_id> the moment an unknown message appears.6 Worked example: a first clean session
Let us join the five steps in one session. The assumptions are written as comments at the point of use.
Figure 14 shows the order the steps must follow. Each stage depends on the one before it.
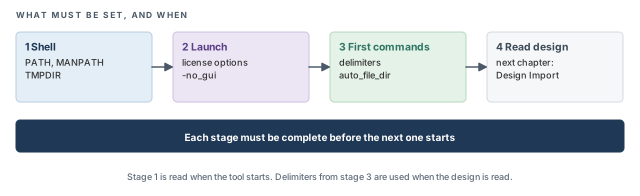
The task. You must time a block in four views, using Tempus L. The run needs more threads than one L license gives, so it needs MP. The design has not been read yet. This session only prepares and launches the tool.
Step 1 – prepare the shell
All three variables must be set in the shell before the tool starts.
# Assuming the tool is installed under /tools/tempus
% setenv PATH /tools/tempus/bin:${PATH}               ;# find the tempus binary
% set T = /tools/tempus/share                         ;# shorthand for the share tree
% setenv MANPATH ${T}/tempus/man                      ;# default command entries
% setenv MANPATH ${MANPATH}:${T}/tempus/stylus_man    ;# add the Stylus entries
% setenv MANPATH ${MANPATH}:${T}/tcltools/man         ;# add the Tcl tool entries
% setenv TMPDIR /scratch/tabish/blkA_tmp              ;# large local scratch
Before moving on, confirm that the scratch folder exists and that you can write to it. Remember that an unwritable TMPDIR falls back to /tmp without a warning.
Step 2 – choose the licenses
Four views on Tempus L need CMMMC. From Table 4, 1 L plus 1 ECO covers up to 8 views. We also need MP for threads. With L plus MP, the session gets 8 + 16 = 24 CPUs.
Thus, both ECO and MP go into the startup list, so a shortage fails fast. The base license is checked out at launch as always.
# Console launch; ECO and MP are held from the first second
% tempus -no_gui \
    -lic_startup_options "Tempus_Timing_Signoff_TSO Tempus_Timing_Signoff_MP"
If either option is not free, the launch fails here. That is exactly what we want. It is far better than a stop after an hour, or a silent fallback to one view.
Step 3 – settle file locations, then look up the next command
tempus> set_global auto_file_dir ./blkA_auto   ;# keep auto files per run
tempus> help read_lib                          ;# syntax for the next chapter
The first line keeps this run's auto-generated files in their own folder. The second line shows how to look up the first import command before using it.
The set_global form in Step 3 is one way to set a global setting. Confirm the exact form with help auto_file_dir in your installation before using it in a production script.
Step 4 – verify before trusting anything
After the design is loaded (next chapter), check the log for two things. First, confirm that ECO and MP were checked out. Second, count the active views – there must be four, not one.
If the view count is one, the ECO license was not used to enable CMMMC. Stop and fix the licensing before you read any timing report.
7 Common mistakes and how to catch them
Table 6 gathers the mistakes from this chapter. Each row gives the symptom you would see first.
| Symptom | Likely cause | Fix |
|---|---|---|
| Clean report, but only one view timed | Tempus L with no CMMMC-enabling license free; the tool fell back to SMSC | Add ECO (up to 8 views) or use XL; check the view count |
| Run stops late with a license error | Option checked out dynamically, none free | Put the option in -lic_startup_options |
| "Fail to find any Tempus Timing Solution license" with valid licenses | License server older than 11.16.4.0 | Restart the server with daemons from the install tree |
Run slows or fills /tmp |
TMPDIR not writable, silent fallback to /tmp |
Point TMPDIR at a writable local scratch disk |
| Tool does not launch at all | No free space under TMPDIR |
Free space or choose another disk |
man finds no entries |
MANPATH not set |
Add the three manual folders from the install tree |
| Parallel runs overwrite each other's files | Shared run folder, no auto_file_dir |
Give each run its own auto_file_dir |
| More than 8 views fail on L plus ECO | L plus ECO is not accepted above 8 views | Use 2 XL (up to 16 views) or 3 XL |
| Names do not match between netlist and parasitics | Delimiters set after the design was read | Set delimiters before import |
8 Interview preparation
Tempus L is Tempus XL without concurrent multi-view (CMMMC) analysis.
- L gives 8 CPUs per license, XL gives 16.
- XL adds CMMMC, and it is the license a DSTA master needs.
- Both are base licenses, so either one can start a session.
No. An option license never starts the tool; it always needs a base license.
- ECO, MP, PI and the node options all sit on top of L or XL.
- The base is checked out at startup; options follow, by default when first needed.
No license that enables concurrent multi-view analysis was free, so the tool silently loaded one view (SMSC).
- L tries to borrow Tempus ECO, or a Voltus L or XL license.
- If none is free, there is no error. The view count in the log is the only clue.
- The fix is ECO with L (up to 8 views) or an XL license.
-lic_startup_options and -lic_options?The first checks licenses out at launch; the second only allows them to be checked out later.
-lic_options ""turns dynamic checkout off.- Inside a session,
set_license_check -checkoutand-optionListdo the same jobs.
So that a shortage fails in seconds instead of in the middle of a long run.
- A late failure wastes the base license time and the compute already spent.
- The whole job must then be rerun from the start.
24 CPUs: 8 from L and 16 from MP.
- Each license adds its own CPUs; extra L adds 8, extra XL or MP adds 16.
- By default, the tool checks out MP first, then L, then XL.
Under the folder named by TMPDIR, in a per-session subfolder; the default is /tmp.
TMPDIRmust be set before launch.- The subfolder is deleted when the session ends, even after a crash.
TMPDIR points to a folder you cannot write to?The tool silently falls back to /tmp and continues.
- If the disk has no space instead, the tool does not launch at all.
- The silent case is worse, because a small shared
/tmpcan fill up mid-run.
Two Tempus XL licenses.
- 1 to 8 views need 1 XL, or 1 L plus 1 ECO.
- 9 to 16 views need 2 XL. L plus ECO is not accepted above 8 views.
- An unlimited number of views needs 3 XL.
Run help on the message ID inside the tool, then man for detail if it exists.
- Not every message has a detailed entry.
- The help in the tool always matches the version you are running.
The license server daemons are older than 11.16.4.0.
- Check with
lmgrd -vandcdslmd -v. - Restart the server with the daemons from the install tree.
Chapter recap
Key takeaways
- Tempus reads libraries, a netlist, constraints and parasitics, and turns them into slack.
- Every session needs one base license, L or XL. Options ride on top and never start the tool alone.
- Tempus L with several views can silently fall back to one view (SMSC). Always check the view count.
- Licenses stack: L adds 8 CPUs, XL and MP add 16 each.
- Request expensive options at launch, so shortages fail fast.
- Set
TMPDIRto a writable local scratch disk before launch. An unwritable one falls back to/tmpwithout a warning. helpandmananswer most questions about commands and messages inside the session.
Command recap
| Command or switch | Purpose |
|---|---|
tempus -no_gui |
Launch with a console prompt |
tempus -stylus |
Launch with the Stylus command interface |
-lic_startup_options |
Check out licenses at launch |
-lic_options |
Allow licenses to be checked out later; "" turns this off |
set_license_check -checkout, -optionList |
Change licenses inside a session |
lmgrd -v, cdslmd -v |
Check license server versions |
auto_file_dir, auto_file_prefix |
Redirect and name auto-generated files |
help, man |
Command syntax, details and message meanings |
viewlog -file |
View a log outside the tool |
cda |
Browse help pages in the Doc Assistant |
Compact glossary
| Term | Meaning |
|---|---|
| STA | Static timing analysis: checking every path's timing without simulation |
| Timing path | The route from where data is launched to where it is captured |
| Slack | The margin by which a timing check is met; negative means a violation |
| Base license | L or XL; needed to start a session |
| Option license | ECO, MP, PI and others; adds features to a running base |
| View | One corner plus one constraint mode |
| CMMMC | Concurrent multi-mode multi-corner: several views in one session |
| SMSC | Single-mode single-corner: one view only |
| DSTA | Distributed STA: one analysis split across machines |
| Dynamic checkout | An option is requested only when a command first needs it |
| Message ID | The tag on a log message, such as TECHLIB-1002 |
Practical perspective
On a real project, the start-up script is written once and reused for months. Thus, small mistakes in it repeat in every run. It is worth spending an hour to get licenses, TMPDIR and file locations right. That hour saves many failed overnight runs and, more importantly, one unchecked corner at signoff.
What comes next
The tool is now running and waiting at the prompt. In the next chapter, Design Import, we read the libraries, netlist, constraints and parasitics into the session. We will also see why the order of the read commands matters.