Chapter overview
Late in a project, the design is routed and almost clean. Signoff STA still shows a few hundred violations. Some are hold violations on short paths. Some are slew violations on long nets. Some paths pass in one corner and fail in another.
Fixing these by hand in the place-and-route (P&R) tool is slow. Each fix there is checked with a different timer. Thus, a fix can look good in P&R and still fail at signoff. A signoff ECO solves this. ECO stands for engineering change order – a small, controlled change to a nearly finished netlist.
In a signoff ECO, Tempus decides the fixes using signoff-accurate timing in every view at once. It writes the changes as ECO files. The P&R tool then applies them with minimal disturbance. This chapter teaches that flow, from the basic run to the large-design variants.
The chapter is long because the ECO stage has many tools. However, the core idea never changes. One timer decides, the other tool applies, and signoff checks the result. Every later section is a way to do the same job faster, on a bigger design, or with tighter limits.
Learning objectives
- Describe the signoff ECO loop, its inputs, its outputs and the netlist changes it may make.
- Build, save, load and merge an ECO timing database, or let the tool build it in batch.
- Run
eco_opt_designfor DRV, setup, hold, area, leakage and power, including incremental steps. - Turn on glitch, SI slew, crosstalk, IR drop and cell EM fixing, with their prerequisites.
- Use path-based retiming to recover power and then recover setup.
- Set up a Paradime run and explain what the master and the clients each do.
- Run the ECO from inside Innovus with
signoffTimeDesignandsignoffOptDesign. - Choose between hierarchical ECO, HC-ECO and Top plus boundary model ECO for a large design.
- Restrict fixing to selected endpoints, buffer along routes, and skew clocks for setup.
- Prepare and run a post-mask metal ECO with PFC or GA fillers.
Chapter roadmap
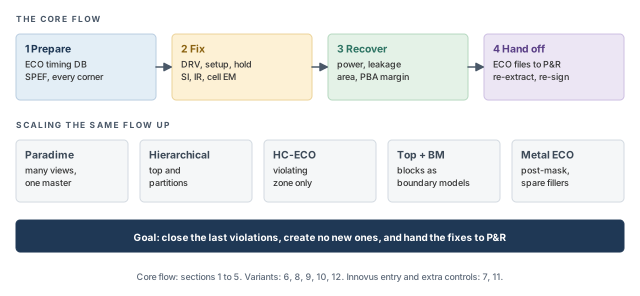
The chapter first builds the core flow and then scales it. Figure 1 shows the plan. Come back to it whenever you lose your place.
Key commands
Table 1 groups the main commands and settings by section. Each one is explained where it is first needed.
| Section | Command or setting | What it does |
|---|---|---|
| 1 Overview | tempus -eco |
Start Tempus with the ECO feature |
| 2 ECO timing DB | set_eco_opt_mode -save_eco_opt_db, write_eco_opt_db |
Save one timing DB per active view |
| 2 ECO timing DB | set_eco_opt_mode -load_eco_opt_db |
Use a saved DB for the ECO |
| 3 Optimization | eco_opt_design -drv -setup -hold -area -leakage -power -dynamic |
Run the fixes and write ECO files |
| 3 Optimization | set_filler_mode -core |
Declare filler cells the ECO may remove |
| 4 SI, IR, EM | -fix_glitch, -fix_si_slew, -fix_xtalk, -fix_ir_drop, -fix_cell_em |
Extra fixes run through -drv |
| 5 PBA and power | -retime, -max_slack, -setup_recovery, report_power |
Path-based power and setup recovery |
| 6 Paradime | set_distribute_mmmc_mode -eco true, distribute_command |
Interactive multi-view ECO |
| 7 From Innovus | signoffTimeDesign, signoffOptDesign |
Run the signoff ECO from P&R |
| 8 Hierarchical | merge_hierarchical_def, -partition_list_file, -optimize_replicated_modules |
Fix paths across partitions and clones |
| 9 HC-ECO | -enable_high_capacity_eco, -inter_partition, -include_setup_path_groups |
Build a reduced "violating zone" DB |
| 10 Top + BM | timing_enable_boundary_model_eco, create_boundary_model |
ECO on a top with boundary-model blocks |
| 11 Other controls | -along_route_buffering, -select_hold_endpoints, -allow_skewing |
Fine control of where and how to fix |
| 12 Metal ECO | -post_mask, -use_pfc_filler_list, -use_ga_filler_list |
Fixes that change only metal layers |
1 What a signoff ECO does
1.1 The concept
A signoff ECO is a short repair job on a finished layout. Its job is to fix the violations left after signoff STA, or to recover power where there is spare slack. It does not rebuild the design. It makes small changes and writes them down for the P&R tool.
A useful picture is a car after its final inspection. The inspector finds a worn tire and a loose mirror. Nobody rebuilds the car. A mechanic changes exactly those two parts, and the inspector checks the car again. In a signoff ECO, Tempus plays both the inspector and the planner. P&R is the mechanic.
The feature needs its own license and is started with tempus -eco. The licensing rules are in Getting Started with Tempus.
1.2 Why it matters
Let us consider a block with 300 hold violations in the fast corner. P&R hold fixing used a simpler timer and thought the block was clean. Thus, fixing again in P&R repeats the same blind spot.
Tempus sees exactly the timing that signoff sees. Its fixes are judged by the same delay calculation, the same SI analysis and the same derates. Thus, a fix chosen by Tempus is much more likely to survive the next signoff run. The project closes in fewer loops, and each loop saved often means a day or more of schedule.
1.3 How it works
Figure 2 shows the ECO loop. Each pass through it is one ECO iteration.
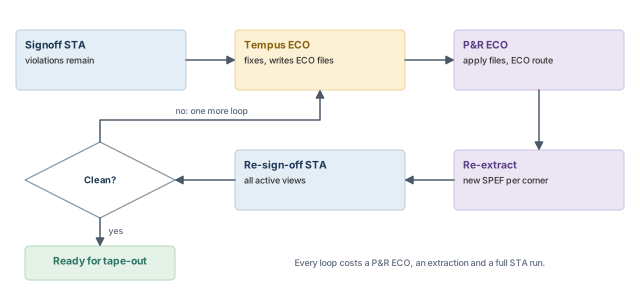
- Signoff STA finds the remaining violations.
- Tempus ECO chooses fixes and writes ECO files.
- P&R ECO applies the files and runs an ECO route.
- Re-extraction produces new parasitics for the changed nets.
- Re-sign-off times every view again.
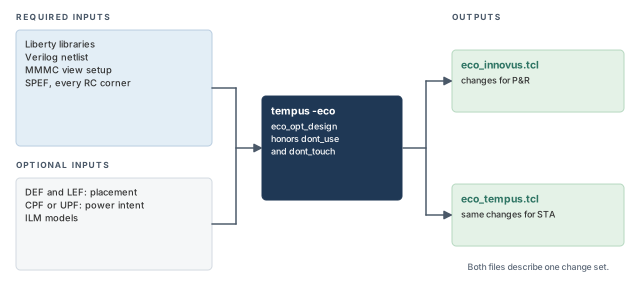
The inputs are the same as for signoff STA: libraries, the Verilog netlist, the MMMC view setup and SPEF. Optional inputs add detail – DEF and LEF for physical data, CPF or UPF for power intent, and ILM models. Physical data matters because a new buffer needs a legal location. Power intent matters because a cell must sit in the right supply domain.
The output is an ECO file that P&R applies incrementally. Typically, nothing in the existing layout moves unless a fix needs it.
Figure 3 gathers the inputs and outputs in one place. The required inputs on the left are the same data that signoff STA already reads.
1.4 The changes an ECO may make
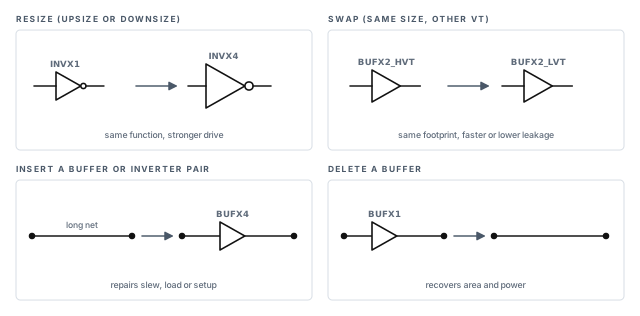
The tool has four basic transforms, shown in Figure 4. These are the netlist changes a normal timing ECO makes.
- Resize – replace a cell with a stronger or weaker version of the same function. A stronger cell drives its load faster, which helps setup and slew. A weaker cell saves area and power.
- Swap – replace a cell with a variant of the same size, for example another threshold voltage (Vt). A low-Vt cell is faster but leaks more. A high-Vt cell is slower but leaks less.
- Insert – add a buffer or an inverter pair on a net. This splits a long net, isolates a heavy load, or adds delay for hold.
- Delete – remove a buffer or an inverter pair that is no longer needed. This recovers area and power.
The tool respects dont_use cells and dont_touch objects. It also handles multi-supply-voltage (MSV) designs, hierarchical designs and master/clone modules.
Read the transform list as the limit of what the ECO does. It does not re-synthesize logic or move large regions. Thus, if a violation needs a logic change, it is a design fix, not an ECO fix.
2 The ECO timing database
2.1 The concept
Running full STA inside every ECO step would be slow. Thus, Tempus first writes an ECO timing database (ECO DB). It is a lightweight graph of the setup and hold timing. The ECO step reads this graph instead of re-timing the whole design.
Think of the DB as a map with the traffic already measured. The ECO plans its route changes on the map. It does not drive every road again before each decision.
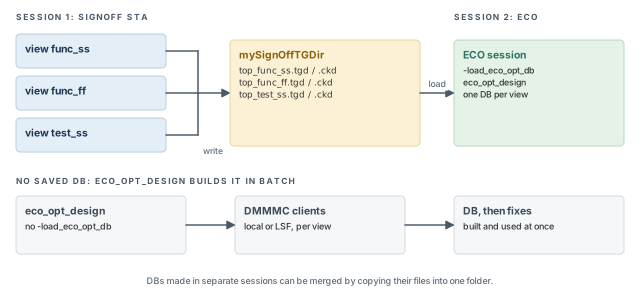
There is one DB per active view. Each view writes two files: <top>_<view>.tgd and <top>_<view>.ckd. For example, a design top with views func_ss and func_ff writes four files. Figure 5 shows both ways to get a DB.
2.2 Why it matters
The DB is the ECO's whole view of timing. If the DB was written with wrong settings, every fix is decided on wrong numbers. Thus, the DB must be written from a run that matches signoff – same SPEF, same derates, same SI settings. A DB from a careless run gives a careless ECO.
2.3 Saving and loading a DB
The DB folder is named with set_eco_opt_mode, and write_eco_opt_db writes it.
tempus> set_eco_opt_mode -save_eco_opt_db mySignOffTGDir   ;# name the DB folder
tempus> write_eco_opt_db ;# one .tgd/.ckd pair per view-save_eco_opt_db <dir>– names the folder thatwrite_eco_opt_dbfills. Without it, there is no saved DB to reuse later.write_eco_opt_db– writes the files for every active view. Run it after timing is fully up to date.
Later, in a new session, the ECO points to the same folder. In a concurrent MMMC session with fewer than about eight views, the load can happen in the same session.
tempus> set_eco_opt_mode -load_eco_opt_db mySignOffTGDir   ;# reuse the saved DB
tempus> eco_opt_design -hold ;# fix hold violations-load_eco_opt_db <dir>– tellseco_opt_designto read this DB instead of building one. Set it before the ECO command runs.
If views were timed in separate sessions, copy all their files into one folder. The tool then sees one merged DB. For example, a func_ss run and a func_ff run can each write a DB, and one copy step joins them. The clients that build a DB can run locally or on LSF.
2.4 Letting the ECO build the DB
When -load_eco_opt_db is not given, eco_opt_design builds the DB itself. It does this in batch with distributed MMMC (DMMMC) clients, one per view. The design must be fully loaded, with SPEF for every active RC corner.
read_lib $liberty                  ;# timing libraries
read_lib -lef $lef                 ;# physical libraries
read_verilog $netlist              ;# netlist
set_top_module my_top              ;# link
source viewDefinition.tcl          ;# MMMC views
read_def $def_file                 ;# placement and routing
source spef.tcl                    ;# SPEF for every active rc_corner
set_distribute_host -local         ;# clients on this machine
set_multi_cpu_usage -localCpu 8 -remoteHost 2 -cpuPerRemoteHost 4   ;# CPUs
eco_opt_design -hold               ;# builds the DB, then fixes hold
set_distribute_host -local– starts the DB-building clients on the local machine. LSF can be used instead.set_multi_cpu_usage– sets the CPUs for the master and the clients, as in Multi-Mode Multi-Corner Analysis.
It is better to save the DB from your signoff STA run. The ECO then starts from exactly the timing you signed off, and you can rerun the ECO without re-timing.
eco_opt_design build it with distributed clients.3 Running the basic optimization
3.1 The command
The main ECO command is eco_opt_design. Each switch names one kind of fix or recovery:
tempus> eco_opt_design
    [-area]       ;# recover area
    [-drv]        ;# fix design rule violations (max transition, max capacitance)
    [-dynamic]    ;# dynamic power (confirm details with help eco_opt_design)
    [-hold]       ;# fix hold violations
    [-leakage]    ;# recover leakage power
    [-power]      ;# recover total power
[-setup] ;# fix setup violations-drv– fixes design rule violations (DRV), such as slow transitions and overloaded nets. It is usually run first, because DRV fixes change the slews that setup and hold depend on.-setupand-hold– fix timing violations. Setup fixes speed paths up; hold fixes slow short paths down.-area,-leakage,-power– recover area or power where slack allows. They spend only positive slack, so passing paths stay passing.-dynamic– the name points to dynamic power. Confirm its exact behavior withhelp eco_opt_designbefore relying on it.
The run writes two files. eco_innovus.tcl holds the changes for Innovus. eco_tempus.tcl holds the same changes for Tempus, so you can check them in STA. A fix of one type never creates new violations of the other types. For example, a hold fix must not push a setup path into failure.
3.2 A hold fix, step by step
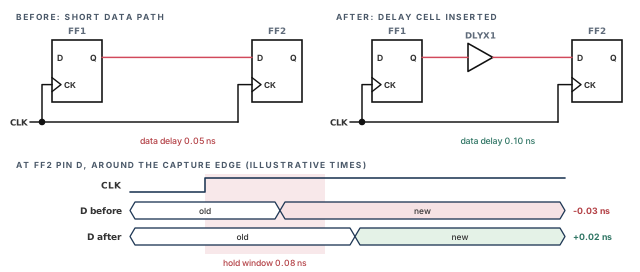
Let us consider the most common ECO – a hold fix. Figure 6 shows a path whose data arrives too soon after the clock edge.
- Assume the capture flop needs data stable for 0.08 ns after the edge.
- Before, the data changes 0.05 ns after the edge. Hold slack is 0.05 − 0.08 = −0.03 ns.
- After inserting
DLYX1(0.05 ns), the data changes at 0.10 ns. Hold slack is 0.10 − 0.08 = +0.02 ns.
The tool also checks the setup side of the same path. Adding 0.05 ns is safe only if setup slack was larger than 0.05 ns. Thus, a short path with plenty of setup margin is the easy case. A path tight on both sides needs a smaller step.
3.3 Prerequisites
The ECO is only as good as the timing it sees. Thus, set up the timing exactly as for signoff before you run it:
- Read SPEF for every active RC corner, for example
read_spef -rc_corner rc_max max.spef.gz. A view without parasitics is timed wrongly. - Include coupling capacitance in the SPEF, so SI is analyzed. Without it, crosstalk delays are missing.
- Set derates, AOCV, globals and multi-CPU usage before
eco_opt_design. A setting added afterwards does not affect the fixes already chosen.
3.4 Fillers, flops and buffers
- Fillers. The ECO deletes filler cells automatically to make room for new cells. However, it must know which cells are fillers. Declare them with
set_filler_mode -core {{cells1} {cells2}}. Undeclared fillers look like logic, so the tool may find no free space. - Flops. Flop sizing is enabled with
set_eco_opt_mode -optimize_sequential_cells true. Turn it on when flops drive weak or slow outputs. - Buffer removal.
set_eco_opt_mode -delete_inst truelets area recovery delete buffers, not only resize cells. - Inverter pairs. A setup fix may insert a pair of inverters instead of a buffer. The function is unchanged, because two inversions cancel.
3.5 Incremental steps
You can split the ECO into several steps, for example DRV first and then hold. Turn this on with -allow_multiple_incremental true. Give each step a unique -eco_file_prefix, so its files do not overwrite the previous ones.
tempus> set_eco_opt_mode -load_eco_opt_db ECOdb                ;# saved DB
tempus> set_eco_opt_mode -allow_multiple_incremental true      ;# allow steps
tempus> set_eco_opt_mode -eco_file_prefix DRV_FIX              ;# files for step 1
tempus> eco_opt_design -drv                                    ;# step 1: DRV
tempus> set_eco_opt_mode -eco_file_prefix HOLD_FIX             ;# files for step 2
tempus> eco_opt_design -hold ;# step 2: hold-allow_multiple_incremental true– lets a later step build on the changes of an earlier one in the same session.-eco_file_prefix <name>– names the files of the next step. P&R then applies the files in order.
If the fixes need room, recover area first. However, keep the number of steps small. Each extra step adds risk that P&R and Tempus timing drift apart. As a rule of thumb, two or three steps are normal; ten steps are a warning sign.
Forgetting SPEF for one RC corner. The views on that corner are timed with missing parasitics, so their fixes are wrong. Always read SPEF for every active RC corner before the ECO.
eco_opt_design fixes one category per switch and writes ECO files for both tools. Signoff-identical setup, declared fillers and few incremental steps keep it accurate.4 Fixing SI, IR drop and cell EM
4.1 The concept
Some violations are not plain slew or slack problems. Crosstalk can add delay or cause glitches. IR drop can slow a cell. Electromigration (EM) can wear out a cell's metal over years of use. All of these are fixed through eco_opt_design -drv, with extra switches. Figure 7 shows the switches.
Set these switches during DB generation too. The DB must contain the data each fix needs. For example, a DB written without SI slew data cannot drive an SI slew fix.
eco_opt_design -drv can fix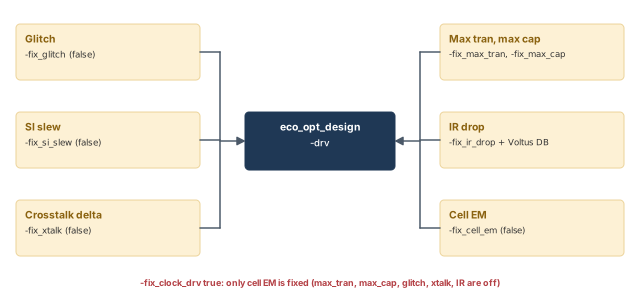
-drv covers them otherwise.What to notice: -fix_clock_drv true is special: it turns every other fix off and leaves only cell EM.-fix_ir_drop is set with set_eco_opt_mode. The other switches in this section are ECO-mode switches given here by name. Confirm the exact command that takes each one with help set_eco_opt_mode before you script it.
4.2 Glitch
A glitch is a short noise pulse on a quiet net, caused by a switching neighbor. If it is large enough, a receiving flop can capture a wrong value. Glitch, Overshoot and Undershoot explains the analysis.
Turn glitch fixing on with -fix_glitch true; the default is false. It runs before max transition and max capacitance fixing. To analyze glitches first, use set_si_mode -enable_glitch_report true and report_noise.
To fix only glitches, switch max capacitance and max transition fixing off. The switch settings are:
-fix_max_cap false -fix_max_tran false -fix_glitch trueThen run eco_opt_design -drv. Glitches that remain are usually fixed with SI routing rules in P&R, such as extra spacing or shielding.
4.3 SI slew
Crosstalk also makes transitions slower. This is the SI slew. A slow transition can break a max transition limit, and it slows every cell it drives. Turn its fixing on with -fix_si_slew true; the default is false.
Only DRV fixing honors SI slew. Thus, run the SI slew fix first, before setup and hold. The DB must be generated with set_si_mode -enable_drv_with_delta_slew true.
To report SI slew violations, set timing_use_incremental_si_transition and use report_constraint:
tempus> set_global timing_use_incremental_si_transition true   ;# include SI slew
tempus> report_constraint -drv_violation_type max_transition \
    -all_violators                                              ;# list them
4.4 Crosstalk delta delay
A delta delay is the extra delay crosstalk adds to a net. A large crosstalk delta delay can be fixed directly with -fix_xtalk true; the default is false. It needs these SI settings:
tempus> set_si_mode -separate_delta_delay_on_data true \
    -delta_delay_annotation_mode lumpedOnNet   ;# delta lumped per net
Then turn on -fix_xtalk true. The SI settings make the delta visible per net, so the tool can pick nets to fix. Two thresholds decide which nets qualify. Figure 8 shows them on one net.
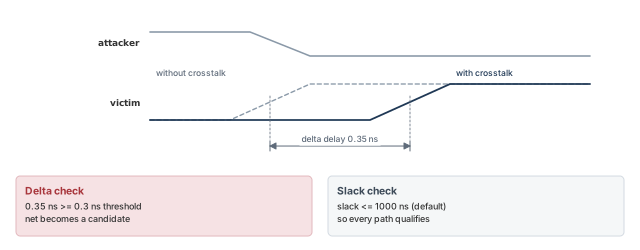
-setup_xtalk_delta_thresholdand-hold_xtalk_delta_threshold– fix when the delta is at least this value. The default is 0.3 ns.-setup_xtalk_slack_thresholdand-hold_xtalk_slack_threshold– fix when the slack is at most this value. The default is 1000 ns, which in practice means any slack.
For example, a net with a 0.35 ns delta on a path with +0.4 ns slack qualifies by default. Setting the slack threshold to 0 ns would skip it, because the path already passes.
4.5 IR drop
IR drop is the supply voltage lost in the power grid. A cell with less voltage switches more slowly. IR drop fixing reads voltage-drop results from Voltus. It downsizes attackers that have positive slack when they hurt a violating victim. A smaller attacker draws less current, so the victim sees less drop.
Figure 9 shows the idea on two cells that share a supply rail. The attacker gives up some of its spare slack, and the victim gains back the voltage it needs.
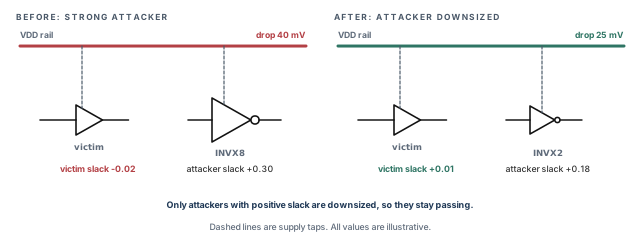
tempus> set_eco_opt_mode -fix_ir_drop true \
    -load_irdrop_db voltus_ir_dir     ;# illustrative folder of Voltus files
tempus> eco_opt_design -drv ;# fix-fix_ir_drop true– turns IR-aware fixing on.-load_irdrop_db <dir>– points to the Voltus result files. Without them, the tool has no IR data.
4.6 Cell EM
Cell EM is electromigration inside a cell's own metal. High current slowly moves metal atoms until a wire thins or breaks. Cell EM fixing is turned on with -fix_cell_em true; the default is false. -em_type selects the current type: all, avg, peak or rms. The default is all.
-fix_clock_drv truefixes only cell EM. Max transition, max capacitance, glitch, crosstalk and IR fixing are all off.- From Innovus, the same fix is
setSignoffOptMode -fixCellEm truewith its-emTypeoption, followed bysignoffOptDesign -drv. - Cell EM depends on switching activity. Apply
set_switching_activityorread_activity_filebeforeeco_opt_design. - In Paradime, the activity comes from the dynamic power view, or from
eco_dynamic_vieworeco_leakage_view. Set these beforedistribute_read_design.
Running setup and hold before SI slew. Only DRV fixing honors SI slew, so later steps can leave slew violations behind. Run the SI slew fix first.
-drv with their own switch. Set them at DB time too, and run SI slew first.5 Path-based ECO and power recovery
5.1 The concept
Graph-based analysis (GBA) takes the worst slew at each pin, for every path through it. This is safe but pessimistic. Path-based analysis (PBA) retimes each path with its own real slews. PBA slack is usually better. Path-Based and Robustness Analysis explains why.
For an ECO, this difference is valuable. Let us consider a path with −0.02 ns GBA slack and +0.01 ns PBA slack. A GBA-driven ECO fixes it. A PBA-driven ECO leaves it alone, because it never really failed. Thus, PBA fixes fewer false violations and finds more spare slack for power recovery.
5.2 PBA settings
These set_eco_opt_mode options control PBA inside the ECO:
| Option | Default | Meaning |
|---|---|---|
-retime |
path_slew_propagation |
PBA mode used for retiming |
-check_type |
both |
Retime setup, hold or both |
-max_slack |
0 | Retime paths with GBA slack up to this value |
-max_paths |
−1 | Limit on retimed paths (−1 means no limit) |
-nworst |
−1 | Paths per endpoint (−1 means no limit) |
-pba_effort |
– | Effort of the PBA retiming, for example high |
-max_slack– the default 0 retimes only failing paths. With-max_slack 10, paths with positive GBA slack are retimed too. Their PBA slack is larger, which gives more margin for power recovery.-max_pathsand-nworst– limit the work. Large limits give better results but longer runtime.-pba_effort– trades runtime for accuracy. Usehighfor the final ECO.
Figure 10 compares the two -max_slack settings on seven paths. Filled dots are retimed with PBA; hollow dots keep their GBA slack.
-max_slack sends to PBA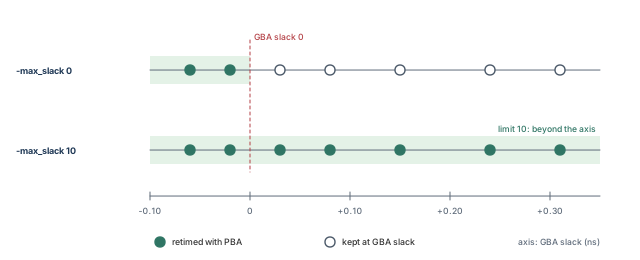
5.3 Power recovery
eco_opt_design -power recovers leakage, switching and internal power together. Run report_power first, so the tool has the power numbers. It uses default toggle rates, or a VCD or SAIF activity file if one is read. Flops do not need a Fixed attribute for this step.
Power recovery spends positive slack. A path with +0.3 ns slack may get slower, higher-Vt cells and end at +0.02 ns. Figure 11 shows the typical effect on the slack distribution.
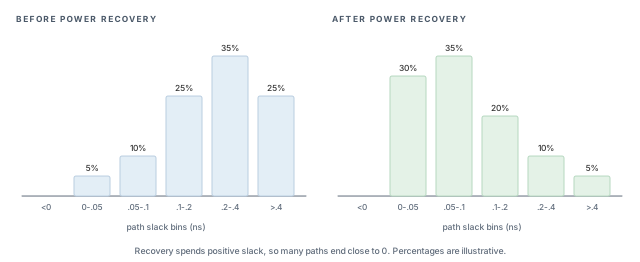
5.4 Setup recovery
After power recovery, some paths may sit close to failing. -setup_recovery true with eco_opt_design -setup recovers setup by Vt swaps only. There is no re-routing, so P&R impact stays small.
Note that a power ECO can touch 30 to 80 percent of the netlist. That is far more than a timing ECO. Thus, plan P&R time and a full re-signoff for it.
5.5 The best total-power flow
The following script gives the best total-power result. It runs PBA power recovery and then setup recovery.
read_design -physical_data postroute.enc.dat top        ;# restore the routed design
# Assuming views, timing settings and parasitics are loaded here
set_multi_cpu_usage -localCpu 16                         ;# CPUs
set_eco_opt_mode -allow_multiple_incremental true        ;# two steps follow
set_eco_opt_mode -retime path_slew_propagation -check_type both -pba_effort high \
  -max_slack 10 -max_paths 10000000 -nworst 50 -delete_inst true \
  -save_eco_opt_db ECO-DB-PBA                            ;# PBA DB with margin
write_eco_opt_db                                         ;# write it
report_power                                             ;# power numbers first
eco_opt_design -power                                    ;# or -leakage
set_eco_opt_mode -max_slack 0 -max_paths 10000000 -nworst 50 \
  -save_eco_opt_db ECO-DB-PBA2                           ;# fresh DB after power
write_eco_opt_db                                         ;# write it
set_eco_opt_mode -load_eco_opt_db ECO-DB-PBA2 -setup_recovery true   ;# recover setup
eco_opt_design -setup                                    ;# Vt swaps only
update_timing -full                                      ;# re-time to check
Let us read it in three parts:
- The first DB uses
-max_slack 10, so many passing paths are retimed with PBA. This exposes the most margin for power. - Power recovery spends that margin.
-delete_inst truealso lets it delete buffers. - The second DB uses
-max_slack 0and drives setup recovery on the changed design. A finalupdate_timing -fullconfirms the result.
If you run -leakage instead of -power, load ECO-DB-PBA with -load_eco_opt_db.
Power recovery works best with a rich list of usable cells and with sequential cells not fixed. More choices let the tool save more power at the same slack.
6 Paradime: interactive multi-view ECO
6.1 The concept
A design with many views needs many timers. Paradime splits the job. A master session holds the netlist and makes the changes. One client per view holds the full timing for that view. The master prompt is dmmmc>. Figure 12 shows the setup.
A kitchen is a fair picture. The head chef decides each change to the dish. Each taster checks it for one customer's taste. The chef never tastes; the tasters never cook.
Paradime needs the -eco license plus DMMMC licenses. Turn it on with set_distribute_mmmc_mode -eco true, and set remoteHost to the number of views. For example, eight views need eight remote hosts.
6.2 Why it matters
A single session with many views may run out of memory or take too long. Paradime spreads the views over machines, yet keeps one place where changes are made. You can also work interactively: make a change, ask every view, and decide the next step.
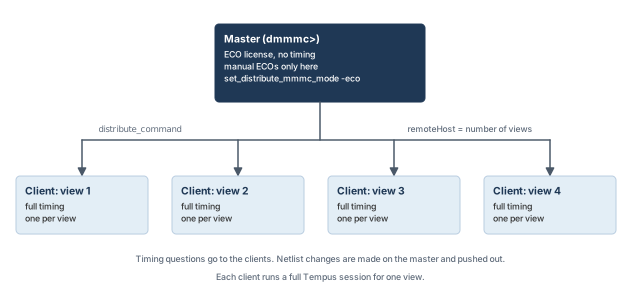
6.3 Two ways to start
Full load. The clients load and time the design from scripts:
set_distribute_mmmc_mode -eco true                     ;# ECO master
distribute_read_design -design_script design_loading.tcl \
    -outdir Output                                     ;# load design
distribute_views -script report.tcl -views {v1 v2}     ;# time views
eco_opt_design -hold ;# fix hold-design_script– the design-loading script each client runs.-outdir– where client output goes.distribute_views -script report.tcl– herereport.tclreads SPEF for all corners and runsupdate_timing -full.
Restored sessions. Each client restores a saved single-view (SMSC) session, one per view:
distribute_read_design -restore_design $Views \
    -restore_dir SavedDir -outdir Output         ;# by folder
# OR, by explicit session paths:
distribute_read_design -outdir Output \
-restore_design { {v1 path/session.enc} {v2 path2/session.enc} } ;# by path- Libraries are read from the paths in the view definition. They are not saved with the session, so those paths must still be valid.
- If the sessions do not share one common view-definition file, use
set_distribute_mmmc_mode -merge_view_definition.
Restoring typically saves time, because each client skips the design import.
6.4 Paradime variables
Set these variables before distribute_read_design:
| Variable | Purpose |
|---|---|
eco_setup_view_list |
Views used for setup fixing (default: all active views) |
eco_hold_view_list |
Views used for hold fixing (default: all active views) |
eco_dynamic_view |
View that supplies dynamic power activity |
eco_leakage_view |
View used for leakage |
eco_lef_file_list |
LEF files for the physical data |
eco_def_file_list |
DEF files for the physical data |
eco_client_tempus_executable |
Tempus executable the clients run |
For example, limiting eco_hold_view_list to the fast views keeps slow views out of hold fixing. Setup is still checked in the setup views, so a hold fix cannot quietly break setup.
6.5 Rules that catch beginners
- Manual ECOs on the master only. Use
change_celloradd_repeateron the master. Never send them throughdistribute_command– that errors out. - The master has no timing. Query timing with
distribute_command [-views {..}] {cmds}, or switch to interactive mode withset_distribute_mmmc_mode -interactive true -views {..|all}. - Settings go to both sides. Apply timing settings on the master and on the clients, for example
distribute_command {set_timing_derate -late -cell_delay 1.01}(an illustrative derate). Push variables withset_distribute_variables "vars" [-view v]. - DB options differ.
-load_eco_opt_dbis not accepted, and-save_eco_opt_dbis ignored. The clients hold live timing instead.
Setting a derate only on the master. The master has no timing, so the clients never see it. The ECO then fixes with the wrong derate. Send every timing setting with distribute_command as well.
eco_* variables first, and send every timing setting to both sides.7 Running the ECO from Innovus
7.1 The concept
Many teams prefer to drive the ECO from the P&R session. The design, the extraction and the ECO route are already there. Innovus provides two commands for this. signoffTimeDesign runs Tempus signoff timing. signoffOptDesign runs the Tempus ECO. If no DB exists, signoffOptDesign runs signoffTimeDesign first by itself.
Figure 13 lays out a typical hold ECO driven from Innovus as eight steps. The top row measures and fixes; the bottom row routes, extracts and measures again. The script below follows the same steps.
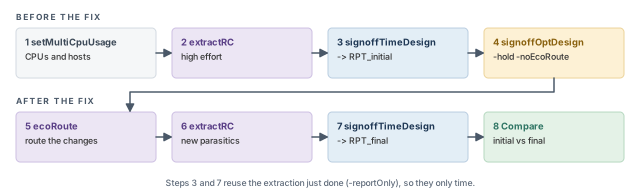
-noEcoRoute in step 4 is why the ECO route appears as its own step 5.7.2 Command breakdown
-reportOnly– reuse the existing parasitics instead of extracting again. Use it when the extraction is already current.-noEcoRoute– apply the fixes but do not run the ECO route. You can then inspect the changes and route them yourself.setSignoffOptMode -preStaTcl FILE– source a Tcl file before the STA step, for example extra timing settings.
setMultiCpuUsage -localCpu 16 -remoteHost 4 -cpuPerRemoteHost 4   ;# CPUs and hosts
setExtractRCMode -effortLevel high                    ;# signoff-quality extraction
extractRC                                             ;# extract
signoffTimeDesign -reportOnly -outDir RPT_initial     ;# timing before
signoffOptDesign -hold -noEcoRoute                    ;# Tempus hold ECO
ecoRoute                                              ;# route the changes
extractRC                                             ;# extract again
signoffTimeDesign -reportOnly -outDir RPT_final       ;# timing after
The script follows the ECO loop of Figure 2 inside one tool. High-effort extraction gives signoff-quality parasitics. The two -outDir folders keep the before and after reports apart, so you can compare them.
signoffTimeDesign times and signoffOptDesign fixes. Keep the before and after reports in separate folders.8 Hierarchical and master/clone ECO
8.1 The concept
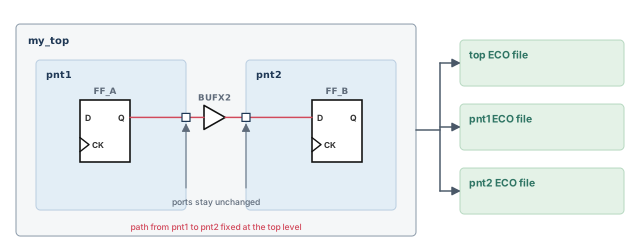
Large chips are split into partitions, each built as its own block by its own team. Some violating paths cross a partition boundary – from the top into a partition, or from one partition to another. A flat ECO cannot fix these cleanly, because each partition is implemented separately.
Hierarchical ECO fixes them while keeping each partition's ports unchanged. Unchanged ports mean the other teams' work stays valid. Figure 14 shows the idea.
dont_toucha module to freeze it. The ECO then fixes the path elsewhere.- The output is one ECO file for the top and one per partition.
8.2 The script
read_lib $liberty                                     ;# libraries
read_view_definition viewDefinition.tcl               ;# views
read_verilog "my_top.v pnt1.v pnt2.v"                 ;# top and partitions
set_top_module my_top                                 ;# link
source timing_settings_and_derating.tcl               ;# signoff settings
merge_hierarchical_def "my_top.def pnt1.def pnt2.def" ;# one physical view
read_spef -rc_corner rc_max "my_top_max.spef ptn1_max.spef ptn2_max.spef"   ;# per corner
set_eco_opt_mode -buffer_cell_list "BUFX1 BUFX2 BUFX8 DLYX1 DLYX4"   ;# allowed buffers
set_eco_opt_mode -load_eco_opt_db myECODB             ;# saved DB (mandatory)
set_eco_opt_mode -partition_list_file partition.txt   ;# list the partitions
eco_opt_design -hold ;# fix holdmerge_hierarchical_def– joins the top and partition DEF files into one physical picture.read_spef -rc_cornerwith several files – reads the top and partition parasitics for one corner. Repeat it for every corner.-buffer_cell_list– the buffers and delay cells the ECO may insert.-partition_list_file– names the partitions, so the tool knows where each fix belongs.
Expecting the hierarchical ECO to build its own DB. It cannot do that in batch. Thus, -load_eco_opt_db is mandatory – write the DB at signoff first.
8.3 Master/clone modules
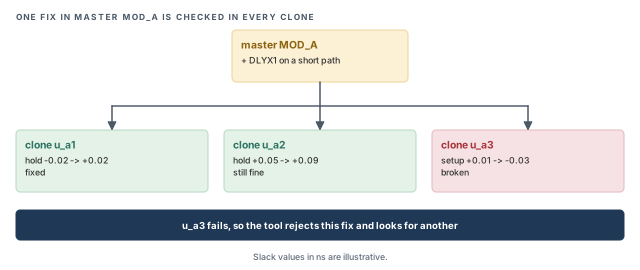
A master module may be placed several times as clones. A fix in the master changes every clone. Thus, the fix must be safe in every clone's context.
For example, a master with three clones may see a hold violation in only one. Adding a delay cell there also slows the other two. If one of them has tight setup, the fix is rejected.
Figure 15 draws this example. The same delay cell lands in all three clones, and each clone judges it in its own context.
- Turn this on with
set_eco_opt_mode -optimize_replicated_modules true. It also enables leakage optimization. - Each fix is checked against every clone context. The output is one ECO file per clone set.
partition.txtlists the master cell.- Load the design with Verilog plus
merge_hierarchical_def, or withread_design -physical_data top.enc.dat my_top. - Clones with different orientations must be assembled in a Tempus or Innovus DB. One flat DEF or Verilog cannot describe them.
9 High-capacity ECO (HC-ECO)
9.1 The concept
On a very large design, even the ECO DB is big. Most of the design, however, has no violations and needs no fixes. HC-ECO keeps only the violating zone – the part of the design the fixes can touch. Figure 16 shows the two-session flow.
The reduction can use three inputs:
- STA violations – keep only the violating paths and their neighborhood.
- A partition list – keep inter-partition or intra-partition paths.
- Path groups plus a DRV pin list – keep chosen groups and chosen pins.
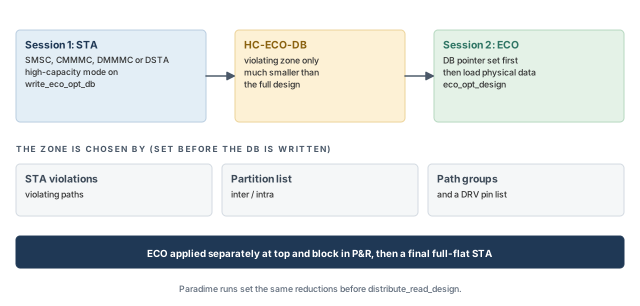
Set the reduction before DB generation. In Paradime, set it before distribute_read_design. A reduction set later has no effect, because the DB is already written.
9.2 Session 1: STA and the reduced DB
Session 1 can be any STA style: single view (SMSC), concurrent MMMC, DMMMC or DSTA.
# Assuming the design is loaded in logical mode with SPEF
set_eco_opt_mode -enable_high_capacity_eco true                 ;# reduced DB
set_eco_opt_mode -retime path_slew_propagation -max_path 5000000 \
  -nworst 50 -max_slack 0 -pba_effort high                      ;# PBA settings
set_power_analysis_mode -dynamic_power_view setup_ss_1p170v     ;# power view
set_eco_opt_mode -save_eco_opt_db HC-ECO-DB                     ;# DB folder
write_eco_opt_db ;# write itThis script spells the option -max_path, while the PBA table uses -max_paths. Confirm the accepted spelling with help set_eco_opt_mode in your installation.
9.3 Session 2: the physical ECO
Session 2 loads the full physical design and fixes inside the zone. The DB pointer comes first.
set_multi_cpu_usage -localCpu 32                      ;# CPUs
set_eco_opt_mode -load_eco_opt_db HC-ECO-DB           ;# DB pointer BEFORE the load
read_lib -lef {tech.lef macro.lef}                    ;# physical libraries
read_view_definition viewDefinition.tcl               ;# views
read_verilog "top.v blockA.v blockB.v"                ;# netlists
set_top_module top                                    ;# link
set_filler_mode -core {{FILL1 FILL2 FILL4}}           ;# illustrative filler names
merge_hierarchical_def top.def blockA.def blockB.def  ;# physical data
# Assuming SPEF for every corner is read here
set_eco_opt_mode -pba_effort high                     ;# PBA effort
set_eco_opt_mode -partition_list_file partition.txt   ;# partitions
set_eco_opt_mode -optimize_replicated_modules true    ;# masters and clones
eco_opt_design -hold                                  ;# fix hold
The ECO is then implemented separately at the top and in each block in P&R. A final full-flat STA confirms the result. The flat run matters, because no reduced view can prove the whole chip is clean.
9.4 Variants
Set these in both sessions:
-inter_partition {blockA blockB} -intra_partition {}– select inter-partition paths. This also enables inter-partition power recovery.-include_setup_path_groups {pg}and-include_hold_path_groups {pg}– select path groups.-select_drv_pin_file {f}– select DRV pins from a file.
Then run eco_opt_design with -drv, -setup or -hold.
9.5 Paradime HC-ECO
In Paradime, the master is prepared in this order:
set_distribute_mmmc_mode -eco trueand the merge setting-merge_view_definitions.- The high-capacity setting
-enable_high_capacity_eco, and the filler setting-set_filler_modewith the value{-corePrefix FILL}. - The
eco_*variables. distribute_read_design -restore_design all -restore_dir DIR -outdir rpt.- The PBA, partition and replicated-module settings, then
eco_opt_design -hold.
For the path-group variant, give -path_group_file_name {script} before the restore.
The merge option is spelled -merge_view_definition for a plain Paradime restore and -merge_view_definitions here. Confirm the spelling, and which command takes each HC option, with help set_distribute_mmmc_mode in your installation.
10 Top plus boundary model ECO
10.1 The concept
Another way to shrink a large ECO is to replace each child block with a boundary model (BM). A BM keeps only the block's interface timing – the logic near its ports. The top-level ECO then runs on the top plus the BMs. The same reductions and approaches as HC-ECO apply. Boundary models are taught in detail in Timing Models.
The difference from HC-ECO is where the saving comes from. HC-ECO keeps the full design but cuts the DB to a zone. Top plus BM cuts the blocks themselves down to their interfaces.
10.2 Generating the boundary models
timing_enable_boundary_model_eco must be set before the BMs are generated, and again before Top plus BM is loaded. The BM generation run uses these settings:
set timing_full_context_flow 1                  ;# full context timing
set timing_sum_cc_for_all_small_aggressors 1    ;# sum small aggressor coupling
set timing_write_aggressors_to_disk 1           ;# keep aggressor data
set timing_enable_model_accurate_nef 1          ;# accurate model data
set timing_enable_filter_fanin_cone 1           ;# filter the fanin cone
timing_enable_boundary_model_eco                ;# BM ready for ECO
create_boundary_model -overwrite -no_extended_fanin -latch_effort_low -skip_constants \
  -exclude_no_delay_port -dir BM_${BlockName}_${view}   ;# one BM per block and view
The comments describe each setting by its name. Confirm the exact meaning of each global and option with help before you change them. The -dir value builds one folder per block and per view.
10.3 The two sessions
Figure 17 puts the block run and the two top sessions side by side. Note the two red steps.
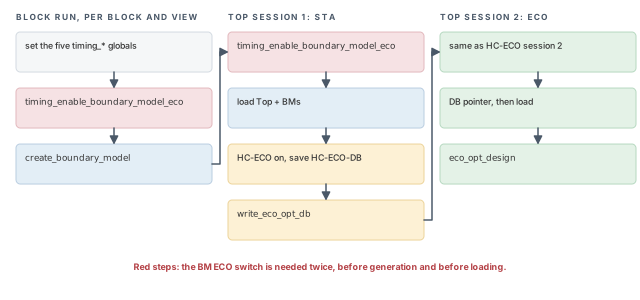
- Session 1: run
timing_enable_boundary_model_eco, load Top plus BM, set-enable_high_capacity_eco trueand-save_eco_opt_db HC-ECO-DB, thenwrite_eco_opt_db. - Session 2: the same as HC-ECO session 2.
- Paradime: the STA run ends with
save_design view1.enc, one saved session per view.
Enabling BM ECO only at load time. The models were generated without ECO data, so interface paths may be missing. Set timing_enable_boundary_model_eco before generation as well.
11 Other ECO controls
The controls in this section are ECO-mode switches given by name. Confirm the command that takes each one with help set_eco_opt_mode before scripting.
11.1 Buffering along the route
A new buffer placed off the existing route forces a detour. The extra wire adds delay and may need new routing tracks. Along-route buffering places the buffer on the route instead. Figure 18 shows the difference. Turn it on with -along_route_buffering true.
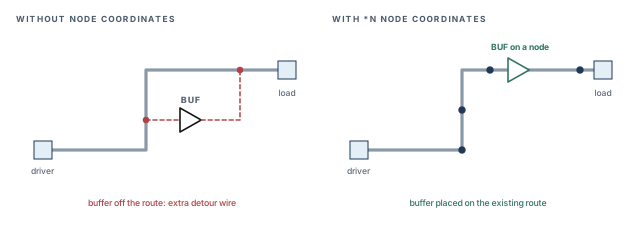
The SPEF must carry *N node coordinates – the location of each point on the wire. The Quantus command output_db -type spef -subtype standard -disable_subnodes false writes such a SPEF. From Innovus, put that command in the Quantus command file given to setExtractRCMode -qrcCmdFile. Then read the SPEF with read_spef -starN.
11.2 Choosing which endpoints to fix
Sometimes only some endpoints should be fixed. For example, a debug block may be excluded, or one view may need extra margin. These controls apply to setup and hold only.
-select_hold_endpoints <file>and-select_setup_endpoints <file>– a file of include and exclude lines.- Each line has the form
<view|V*> include|exclude <pins | minSlack maxSlack | E*>. The default isV* include E*, meaning all views and all endpoints. - Pin wildcards are not allowed. An excluded pin cannot be included again later.
V* include E*
func_ff exclude u_core/u_dbg/reg_0/D
The first line keeps everything. The second line drops one debug pin in the func_ff view only. Because an excluded pin cannot return, put exclusions after the broad includes.
Figure 19 splits a selection line and a margin line into their parts.
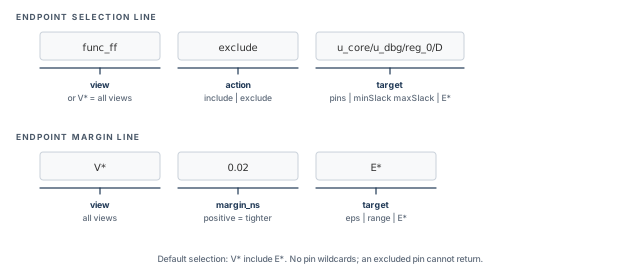
V* and E* mean all views and all endpoints. Specific pins must be named in full.Margins make chosen endpoints tighter:
-specify_hold_endpoints_marginand-specify_setup_endpoints_margin– lines of the form<view|V*> <margin_ns> <eps|range|E*>.- A positive margin makes the target tighter. For example, a 0.02 ns margin in effect asks for at least +0.02 ns of slack.
-optimize_core_only truefixes register-to-register paths only. Other path-group settings are then ignored.
11.3 SmartMMMC
SmartMMMC uses a separate DB that STA writes for the ECO to load next to the normal DB. As its name suggests, it is aimed at runs with many views; confirm its scope with help set_eco_opt_mode.
- In STA, set
-create_smart_mmmc_db truebeforewrite_eco_opt_db. - In the ECO, set
-load_smart_mmmc_db <dir>before the design load, together with-load_eco_opt_db. - In Paradime, use
set_distribute_mmmc_mode -enable_smart_mmmcwith-eco true. Then restore withdistribute_read_design -restore_design -read_db all -restore_dir SavedDir.
The order matters, as with HC-ECO. A DB pointer set after the load is too late.
11.4 Clock skewing for setup
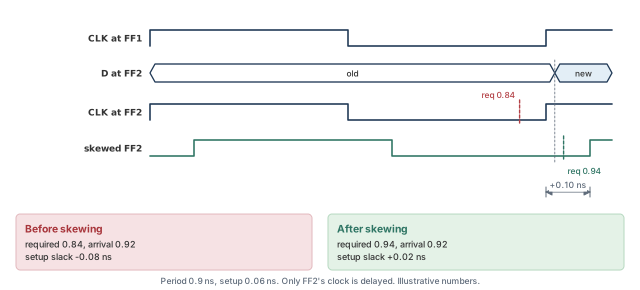
A setup violation can also be fixed by delaying the capture clock. The data then has more time to arrive. Let us consider Figure 20, with a 0.9 ns period and a 0.06 ns setup time.
- Before: required time 0.9 − 0.06 = 0.84 ns. Arrival 0.92 ns. Slack 0.84 − 0.92 = −0.08 ns.
- After a 0.10 ns capture delay: required time 1.0 − 0.06 = 0.94 ns. Slack 0.94 − 0.92 = +0.02 ns.
The switch settings are:
-clock_cell_list {CKBUFX1 CKBUFX4} -allow_skewing true (both mandatory)
-clock_max_level 2 (illustrative limit)Then run eco_opt_design -setup. The clock cell list and -allow_skewing true are both mandatory. -clock_max_level <n> limits how deep in the clock tree the tool may change. Skewing never creates new hold violations. That matters, because a later capture edge also makes hold harder on the same flop.
12 Metal (post-mask) ECO
12.1 The concept
A chip is built in layers. The base layers hold the transistors; the metal layers wire them together. After the masks for the base layers are made, a change that touches transistors is very costly. A metal ECO changes only the metal layers. It builds new logic from spare cells that are already on the chip.
Figure 21 shows the idea with gate-array (GA) fillers. A GA filler is a spare cell whose transistors can be wired into a real gate by metal alone.
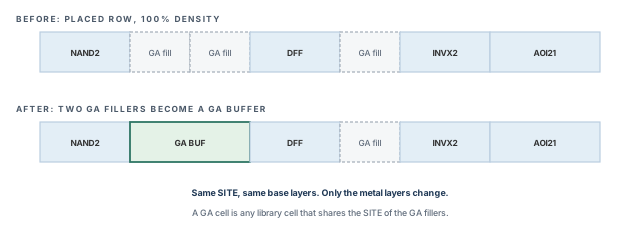
Turn it on with set_eco_opt_mode -post_mask true; the default is false. It fixes DRV, setup and hold, using GA fillers or PFC fillers.
12.2 Prerequisites
- Every cell is placed, and the rows are at 100 percent density. The spare fillers fill every gap.
- Fillers are fine-grained enough to make room for new cells. Coarse fillers leave no small spaces to use.
- No tie cells in tie mode, if tie insertion is not allowed.
- GA cells are the library cells that share the SITE of the GA fillers. Only they can be built from GA filler sites.
12.3 PFC and GA scripts
With PFC fillers, list each filler kind separately – plain fillers, decap fillers and regular logic cells:
tempus> set_eco_opt_mode -post_mask true          ;# metal-only ECO
tempus> set_eco_opt_mode -use_pfc_filler_list \
    {ln10_ecofiller40x ln10_ecofiller4x}          ;# PFC fillers
tempus> set_eco_opt_mode -use_pfc_decap_list \
    {ln10_ecofillsgcap40x}                        ;# PFC decaps
tempus> set_eco_opt_mode -use_pfc_regular_list \
    {ln10_ecodlybt01 ln10_ecobuft04}              ;# PFC logic cells
tempus> set_tie_hi_lo_mode -cell \
    {{ln108_ecotielo01 ln10_ecotiehi01}}          ;# tie cells
tempus> eco_opt_design -hold                      ;# fix hold
With GA fillers, the list is shorter:
tempus> set_eco_opt_mode -post_mask true          ;# metal-only ECO
tempus> set_eco_opt_mode -use_ga_filler_list \
    {GFILL1BWP GFILL2BWP GFILL4BWP GFILL10BWP}    ;# GA fillers
tempus> set_tie_hi_lo_mode -cell {{GATIELO GATIEHI}}   ;# GA tie cells
tempus> eco_opt_design -hold                      ;# fix hold
set_tie_hi_lo_mode -cell names the tie-low and tie-high cells the metal ECO may use. The cell names in both scripts belong to example libraries; use the names from your own library.
13 Worked example: closing hold and slew in one loop
The task. A routed block has three views: func_ss, func_ff and test_ss. Signoff shows 210 hold violations in func_ff and 35 max transition violations, some caused by SI slew. The goal is to close both in one ECO loop. All numbers are illustrative.
Figure 22 shows a typical order of ECO steps. This example needs only the first two: DRV with SI slew, then hold.
Step 1 – write the DB at signoff
SI slew fixing needs SI slew in the DB. Thus, the SI setting goes in before the DB is written.
# Assuming the design, views and SPEF for every RC corner are loaded
set_si_mode -enable_drv_with_delta_slew true       ;# keep SI slew for the DRV fix
# Turn on -fix_si_slew true in the ECO mode here (confirm the form with help)
set_eco_opt_mode -save_eco_opt_db blk_ecodb        ;# DB folder
write_eco_opt_db                                   ;# one DB per view
What to check: the DB folder holds six files – a .tgd and a .ckd for each of the three views.
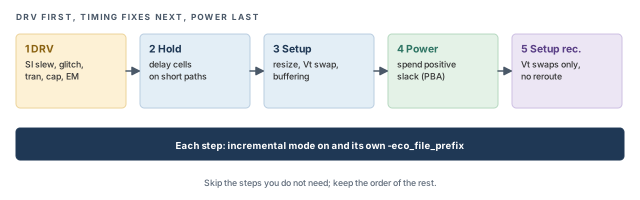
Step 2 – fix DRV first, then hold
SI slew is honored only by DRV fixing. Thus, DRV runs first, and hold runs second as an incremental step.
set_eco_opt_mode -load_eco_opt_db blk_ecodb             ;# reuse signoff timing
set_filler_mode -core {{FILL1 FILL2 FILL4 FILL8}}       ;# illustrative filler names
set_eco_opt_mode -allow_multiple_incremental true       ;# two steps
# Keep -fix_si_slew true on for this step (ECO-mode switch)
set_eco_opt_mode -eco_file_prefix DRV_FIX               ;# step 1 files
eco_opt_design -drv                                     ;# fix slew first
set_eco_opt_mode -eco_file_prefix HOLD_FIX              ;# step 2 files
eco_opt_design -hold                                    ;# then hold
What to check: two sets of ECO files, one per prefix. Load each eco_tempus.tcl in a Tempus session and re-time. The slew and hold violations should be gone, and no new setup violation should appear.
Step 3 – apply in P&R and sign off again
- Source the
eco_innovus.tclfiles from both steps in Innovus, in order. - Run the ECO route and re-extract every RC corner.
- Rerun signoff STA in all three views.
- Confirm that no new setup violations appeared in
func_ss.
If a few hold violations remain after P&R, compare the Tempus result with the post-route timing. A gap often points to routing changes rather than to the ECO choice.
Keep each step's eco_tempus.tcl. If signoff after P&R does not match, apply the same file in Tempus and compare. It shows whether the gap came from the ECO or from P&R.
14 Common mistakes and how to catch them
Table 4 lists the mistakes from this chapter. Each row starts with the symptom you would see first.
| Symptom | Likely cause | Fix |
|---|---|---|
| Fixes look good, but one corner fails after P&R | SPEF missing for one RC corner | Read SPEF for every active RC corner before the ECO |
| Slew violations remain after setup and hold steps | SI slew fixed after other steps, or not in the DB | Set -enable_drv_with_delta_slew at DB time; run -drv with -fix_si_slew first |
| ECO cannot place new cells | Fillers not declared | Declare them with set_filler_mode -core |
| Second step overwrites the first step's files | Same -eco_file_prefix |
Give each step a unique prefix |
| Hierarchical ECO stops at start | No saved DB | Set -load_eco_opt_db; it is mandatory |
Paradime errors on change_cell |
Manual ECO sent through distribute_command |
Run manual ECOs on the master only |
| Paradime ignores a derate | Setting applied on the master only | Also send it with distribute_command |
| Crosstalk fix does nothing | Required SI settings missing | Set -separate_delta_delay_on_data and lumpedOnNet |
| Only cell EM gets fixed | -fix_clock_drv true left on |
Turn it off for a normal DRV run |
| HC-ECO DB is not reduced | Reduction set after DB generation | Set reductions before write_eco_opt_db |
| Top plus BM ECO misses interface paths | BM ECO enabled after BM generation | Enable timing_enable_boundary_model_eco before generation and load |
| Along-route buffering has no effect | SPEF without *N coordinates |
Re-extract with subnodes; read with -starN |
| Metal ECO finds no room | Density below 100 percent or coarse fillers | Meet the post-mask prerequisites first |
15 Interview preparation
It is a small set of netlist changes that fixes the last signoff violations, decided with signoff-accurate timing.
- P&R timing differs from signoff timing, so P&R fixes can miss.
- Tempus judges each fix with the same delay, SI and derate settings as signoff.
- Tempus writes ECO files; P&R only applies them.
Resize, swap, buffer or inverter insertion, and buffer or inverter deletion.
- All four keep the logic function.
- Swap keeps the footprint, so it disturbs P&R least.
- It respects
dont_useanddont_touch.
A lightweight setup and hold timing graph; there is one per active view.
- Each view writes a
.tgdand a.ckdfile. - DBs from separate sessions merge by copying them into one folder.
- The ECO reads the DB instead of re-timing the whole design.
eco_opt_design without -load_eco_opt_db?The tool builds the DB itself in batch, using distributed MMMC clients.
- The design and SPEF for every active RC corner must be loaded.
- Clients can run locally or on LSF.
- Hierarchical ECO is the exception: it cannot build the DB in batch.
Only DRV fixing honors SI slew, so later setup and hold steps can leave SI slew violations.
- The DB needs
set_si_mode -enable_drv_with_delta_slew true. - DRV fixes also change slews that setup and hold depend on.
Nets with a delta delay of at least 0.3 ns; the 1000 ns slack threshold lets any slack through.
- It also needs
-separate_delta_delay_on_data trueand-delta_delay_annotation_mode lumpedOnNet. - Lower the slack threshold to fix only paths that really fail.
-fix_clock_drv true do to the other DRV fixes?It turns them all off; only cell EM is fixed.
- Max transition, max capacitance, glitch, crosstalk and IR fixing are disabled.
- Left on by mistake, a DRV run fixes only cell EM and leaves slew and capacitance violations behind.
-max_slack 10 for PBA power recovery?So paths with positive GBA slack are also retimed with PBA, which reveals more margin to spend on power.
- PBA slack is usually larger than GBA slack.
- After power recovery, a second DB with
-max_slack 0drives setup recovery. - Expect a slack spike near zero afterwards.
change_cell?On the master only; sending it through distribute_command causes an error.
- The master has no timing; timing queries go to the clients.
- Timing settings, in contrast, must reach the clients too.
-load_eco_opt_db mandatory for hierarchical ECO?Hierarchical ECO cannot build its DB in batch, so a saved DB must be given.
- Partition ports stay unchanged.
- There is one ECO file for the top and one per partition.
HC-ECO keeps only the violating zone of the full design; Top plus BM replaces child blocks with boundary models.
- Both use a two-session flow with a reduced DB.
- In both, settings that shape the DB go in before it is written.
A fully placed design at 100 percent density, fine-grained spare fillers, and -post_mask true.
- It uses GA fillers or PFC fillers and changes only metal.
- GA cells must share the SITE of the GA fillers.
Chapter recap
Key takeaways
- A signoff ECO fixes the last violations with small transforms, decided by signoff timing and applied by P&R.
- The ECO reads a timing DB per view. Save it at signoff, or let the ECO build it in batch.
- Read SPEF for every RC corner, declare fillers, and keep incremental steps few with unique prefixes.
- SI, IR and EM fixes all run through
-drv. Set them at DB time and run SI slew first. - PBA retiming finds margin for power recovery; setup recovery then repairs paths with Vt swaps.
- Paradime splits changes (master) from timing (clients). Hierarchical, HC-ECO and Top plus BM scale the flow.
- Endpoint files, along-route buffering, clock skewing and metal ECO give finer control late in the project.
Command recap
| Command or setting | Purpose |
|---|---|
write_eco_opt_db with -save_eco_opt_db |
Save the ECO timing DB |
-load_eco_opt_db |
Use a saved DB |
eco_opt_design -drv/-setup/-hold/-area/-leakage/-power/-dynamic |
Run fixes and recovery |
-allow_multiple_incremental, -eco_file_prefix |
Incremental ECO steps |
set_filler_mode -core |
Declare removable fillers |
-optimize_sequential_cells, -delete_inst |
Allow flop sizing and buffer removal |
-fix_glitch, -fix_si_slew, -fix_xtalk, -fix_ir_drop, -fix_cell_em, -fix_clock_drv |
SI, IR and EM fixes |
-retime, -max_slack, -pba_effort, -setup_recovery |
PBA power and setup recovery |
set_distribute_mmmc_mode -eco true, distribute_command, set_distribute_variables |
Paradime |
signoffTimeDesign, signoffOptDesign, setSignoffOptMode |
ECO from Innovus |
merge_hierarchical_def, -partition_list_file, -optimize_replicated_modules |
Hierarchical and clone ECO |
-enable_high_capacity_eco, -inter_partition, -include_*_path_groups, -select_drv_pin_file |
HC-ECO |
timing_enable_boundary_model_eco, create_boundary_model |
Top plus BM ECO |
-along_route_buffering, read_spef -starN |
Buffer on the route |
-select_*_endpoints, -specify_*_endpoints_margin, -optimize_core_only |
Endpoint control |
-create_smart_mmmc_db, -load_smart_mmmc_db |
SmartMMMC |
-clock_cell_list, -allow_skewing, -clock_max_level |
Clock skewing |
-post_mask, -use_pfc_*_list, -use_ga_filler_list, set_tie_hi_lo_mode |
Metal ECO |
Compact glossary
| Term | Meaning |
|---|---|
| ECO | Engineering change order: a small change to a nearly finished design |
| ECO timing DB | Lightweight setup and hold graph, one per view |
| Transform | Resize, swap, insert or delete |
| DRV | Design rule violation, such as max transition or max capacitance |
| Paradime | Interactive ECO with one master and one client per view |
| Partition | A block implemented separately inside a hierarchical design |
| Master/clone | One module placed several times; a fix must suit every copy |
| HC-ECO | High-capacity ECO on a reduced "violating zone" DB |
| Boundary model (BM) | An interface-only timing model of a block |
| SI slew | Extra transition time caused by crosstalk |
| Delta delay | Extra delay that crosstalk adds to a net |
| Along-route buffering | Placing new buffers on the existing wire route |
| Metal ECO | A post-mask fix that changes only metal layers |
| GA / PFC fillers | Spare filler cells that a metal ECO turns into logic |
Practical perspective
In a real tapeout, the ECO stage is where schedules often slip. Every extra loop costs a P&R ECO, an extraction and a full signoff run. Thus, the habits in this chapter pay off directly. Save the DB at signoff, read every corner, fix SI slew first, and keep the steps few. Teams that follow these habits often close in one or two loops instead of several.
What comes next
The large-design ECO flows used boundary models without explaining them in depth. In the next chapter, Timing Models, we see how ETM, boundary models, PTM and ILM capture a block's timing. We also see when to use each one.